I know how frustrating a wet basement can be—musty smells, pooling water, and walls that never dry. Left unchecked, it can lead to mould, rot, and costly foundation damage.
The problem? Without a proper drainage system, water will keep finding its way in. But here’s the good news—you can fix it!
In this guide, I’ll walk you through installing a basement drainage system. Whether going DIY or hiring a pro, you’ll learn how to dry your basement. Let’s get started!
Step-by-Step Basement Drainage System Installation
If you want a dry basement, installing a proper drainage system is the best long-term solution. This step-by-step guide will walk you through the process, from planning to installation. Whether you tackle this as a DIY project or hire a professional, understanding the steps will help you make informed decisions.
1. Basement Drainage System Installation
A well-installed basement drainage system keeps your home dry and protected from water damage. In Hanover, PA, ground conditions and weather can increase the risk of basement flooding. This guide walks you through each step—from planning to final inspection—so you complete the job efficiently and safely.
2. Key Materials and Equipment
Before diving into installation, get familiar with the core materials and tools:
- Perforated drainage pipe: Typically 4-inch flexible or rigid PVC with holes to collect water.
- Drainage gravel: Clean, ¾-inch crushed stone for pipe bedding and filtering.
- Filter fabric: Permeable membrane to prevent soil from clogging the gravel.
- Sump pump assembly: Includes sump pit, pump, and discharge piping.
- Concrete or HDPE sump basin: Holds collected water beneath your basement floor level.
- Discharge pipe and check valve: Directs and prevents water from returning into the pit.
- Sealant and masonry supplies: For patching slabs, sealing cracks, and finishing.
- Shovels, drywall saw, wheelbarrow, compactor: Common tools for trenching and concrete work.
Tip: Check Hanover’s building codes and permit requirements—especially for sump pump discharge placement—to avoid future compliance issues. The York County building code office provides current regulations.
3. Site Preparation and Safety Measures
3.1 Survey and Marking
- Inspect the basement floor for visible cracks or damp spots.
- Trace the outline of the future drain trench—usually along the perimeter of the foundation slab.
- Confirm the sump pit location near the lowest point and near an electrical outlet.
3.2 Safety Precautions
- Turn off any electrical circuits near the work area.
- Use moisture-resistant drywall or plywood to cover walls and protect from debris.
- Wear personal protective equipment: gloves, safety glasses, and steel-toe boots.
- Ensure the basement has proper ventilation, especially if grinding, sawing, or working with sealants.
4. Trench Cutting and Concrete Removal
- Use a rotary hammer or concrete saw to cut a straight drain trench about 6 inches wide around the slab’s edge.
- Remove the cut slab section to a depth of approximately 6 inches—deeper if local water tables are high.
- Clear out slabs and broken concrete using a sledgehammer or jackhammer, and remove debris with a wheelbarrow.
- Level the exposed area; remove loose soil or debris to ensure stable base conditions.
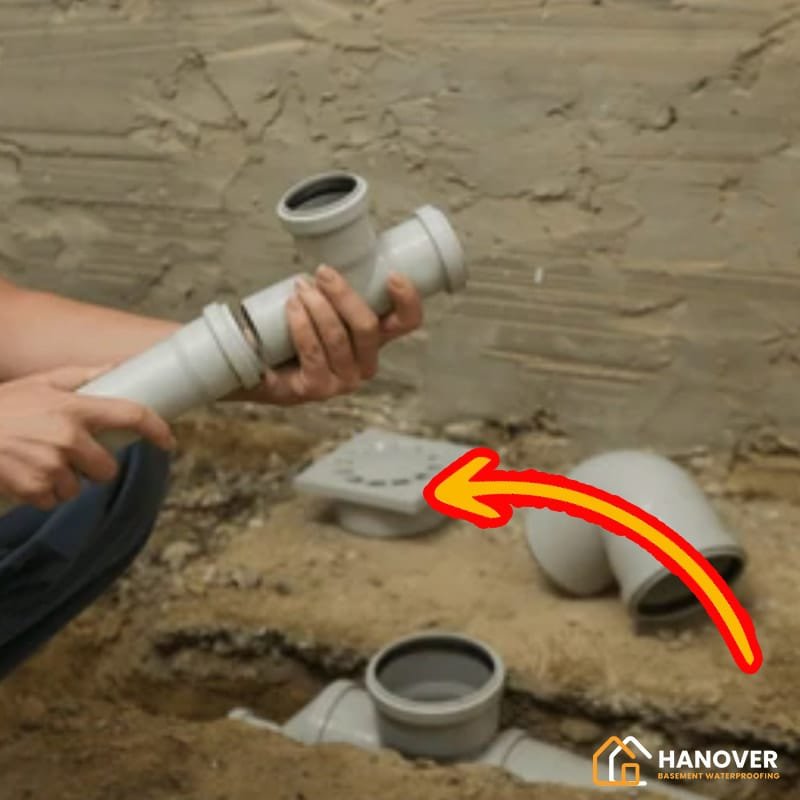
5. Laying the Drainage Pipe and Filter Fabric
5.1 Pipe Installation Steps
- Line the trench with filter fabric, overlapping the edges slightly to wrap the pipe and gravel later.
- Place the perforated drainage pipe into the trench, with holes facing downward to collect water from below.
- Ensure the pipe maintains a consistent slope of about 1% toward the sump pit. Use a line level and gravel leveling for accuracy.
- Connect all pipe sections with PVC couplings or flexible connectors, securing with clamps or sealant where required.
Important: Do not crush or sharply bend flexible pipes—this restricts flow. Use rigid PVC pipe with elbow joints in tight corners.
6. Installing the Sump Pit and Pump Assembly
6.1 Excavation and Pit Placement
- Dig the sump pit hole to match the dimensions of the sump basin—typically 18 inches wide by 24 inches deep.
- Position the basin level and below the pipe outlet grade. The pipe should discharge directly into the pit.
6.2 Assembling the Sump Pump System
- Place a gravel base under the basin for drainage.
- Install the sump pump unit into the basin and attach the discharge pipe using threaded fittings.
- Install a check valve on the vertical discharge line to prevent water backflow.
- Route the pipe out through the basement wall or rim joist to a suitable drainage point, ideally 10 feet away from the foundation.
6.3 Electrical and Backup Setup
- Use a GFCI-protected outlet for power, with a dedicated circuit if possible.
- Consider installing a battery backup pump or water-powered backup system to prevent failures during outages.
Refer to This Old House’s sump pump installation walkthrough for visuals and tool suggestions.
7. Creating a Reliable Gravel Bed
7.1 Backfilling and Wrapping
- Pour clean crushed stone (¾-inch) around the pipe, filling up to at least 3 inches above the top of the pipe.
- Fold the filter fabric over the gravel to fully encapsulate the system. This blocks silt and extends system life.
7.2 Compaction and Leveling
- Use a manual tamper to compact gravel slightly—don’t over-compact, which could damage the pipe.
- Ensure a flat surface for reapplying concrete without voids or air pockets.\
For outdoor runoff problems that contribute to basement moisture, check our guide on how to improve drainage around home before trenching indoors.
8. Re-Pouring and Sealing the Concrete Slab
8.1 Preparing the Pour
- Sweep or vacuum the gravel bed thoroughly to remove debris.
- Apply a bonding agent along trench edges to help the new concrete adhere to the old slab.
8.2 Mixing and Pouring
- Mix high-strength concrete according to manufacturer instructions. Use wheelbarrows or buckets for transport.
- Pour concrete into the trench, spreading evenly with a trowel or screed board.
- Smooth and level the surface with a finishing trowel. Feather edges for a seamless transition to the existing floor.
8.3 Curing the Surface
- Cover with plastic sheeting or mist periodically to prevent premature drying.
- Allow a minimum of 48 hours before walking; wait 7 days before replacing heavy furniture or walls.
9. System Testing and Inspection
9.1 Water Flow Test
- Pour water near the foundation wall to simulate runoff.
- Check that water flows freely through the drain pipe and into the sump pit.
9.2 Sump Pump Function Test
- Plug in the pump and trigger the float valve manually.
- Confirm the pump activates and discharges water outside without leaks.
- Inspect the check valve for tight seal and reverse flow prevention.
9.3 Compliance Check
- Review local regulations with your Hanover building inspector if required.
- Ensure discharge line does not violate neighborhood runoff policies or freeze in winter.
10. Long-Term Maintenance and Troubleshooting
10.1 Routine Inspection Tips
- Check the sump pit every 3 months for debris or sediment buildup.
- Clean the filter fabric layer (if accessible) annually.
- Test the sump pump seasonally—especially before spring thaw and after power outages.
10.2 Signs of Failure
- Water backing up from the drain pipe
- Damp patches or pooling water in corners
- Loud or erratic pump operation
- Discoloration on basement walls or floor
Still unsure what’s causing the issue? Discover why your basement keeps flooding and how to diagnose it before installing a new system.
10.3 Winter Precautions
- Insulate the discharge pipe or use freeze protection valves.
- Ensure the outlet stays clear of ice, mulch, or leaves.
If your basement drainage system fails repeatedly due to shifting soil, professional foundation repair services may be needed to correct deeper structural issues.
11. Final Checklist for Installation Completion
- Trench cut, cleaned, and aligned
- Perforated pipe correctly sloped and wrapped in fabric
- Gravel bed compacted and fabric closed
- Sump pit level and secure
- Pump and check valve installed and operational
- Concrete re-poured and cured
- System tested for flow and pump response
- Discharge line compliant with local code
Conclusion
Installing a basement drainage system is a labor-intensive but manageable task for any committed homeowner or builder. By following the steps in this guide—from material selection to sump pump testing—you protect your property from water damage and boost long-term real estate value.
FAQs
How much does the basement drainage system installation cost?
The cost varies based on the system type and labour involved:
✔ DIY installation: $500 – $2,500 (materials only)
✔ Professional interior drain system: $3,000 – $7,000
✔ Exterior drainage system: $5,000 – $15,000 (includes excavation)
✔ Sump pump installation: $500 – $2,000
Get multiple quotes from contractors to compare pricing before deciding.
What’s the difference between interior and exterior drainage?
✔ Interior drainage is installed inside the basement along the perimeter. It collects water and directs it to a sump pump. This method is best for existing homes with water issues.
✔ Exterior drainage is installed outside the foundation to prevent water from reaching the basement. It is best for new construction or major renovations.
Can I install a basement drainage system myself?
Yes, but it depends on your skill level and the severity of your water issue.
✔ DIY is possible for basic systems if you’re comfortable using a jackhammer and working with drainage pipes.
✔ Hire a professional if your basement has major flooding or structural concerns.
How long does the installation process take?
✔ DIY installation: 3–7 days (depending on experience and basement size).
✔ Professional installation: 1–3 days for most homes.
What type of maintenance does a drainage system need?
✔ Check and clean your sump pump every 3–6 months.
✔ Keep drain pipes clear of debris and buildup.
✔ Inspect for foundation cracks and reseal if needed.
✔ Ensure gutters and downspouts direct water away from the house.