I’ve seen it happen too often—a homeowner thinks their basement is waterproofed, only to wake up to a musty smell, damp walls, or even a full-blown flood. It’s frustrating, expensive, and avoidable. Basement waterproofing isn’t just about slapping paint or installing a sump pump. It’s about doing it the right way from the start.
Many people make simple mistakes that lead to major problems—mold growth, structural damage, and costly repairs. But don’t worry—I’m here to help you avoid those headaches. In this guide, I’ll walk you through the most common basement waterproofing mistakes and how to fix them before they become a disaster. Let’s dive in!
Foundational Waterproofing Mistakes That Compromise Basement Integrity
Poor Exterior Grading
Improper slope around the home’s foundation is one of the leading causes of water infiltration. If the soil around your basement slopes toward the structure rather than away from it, rainwater and melting snow will flow directly toward your foundation walls. This mistake allows moisture to pool at the base of your foundation, increasing hydrostatic pressure and forcing water through cracks and porous surfaces.
How to fix: Regrade the landscape so the ground slopes at least 6 inches over 10 feet away from your home. Use compacted soil mixed with clay to improve runoff.
Missing or Clogged Gutters and Downspouts
Lack of effective roof drainage systems causes water to overflow near the foundation, saturating the soil and promoting basement leaks. In older Hanover homes, it’s common to find missing or undersized gutters or downspouts that don’t extend far enough from the house.
How to fix: Install 5-inch or larger gutters with downspout extensions that lead water at least 6 feet from the foundation. Clean debris seasonally, especially after fall and spring storms.
Failing to Seal Foundation Cracks
Neglected foundation wall cracks, whether vertical or horizontal, serve as direct entry points for water. Even hairline fractures can expand over time with freeze-thaw cycles or pressure shifts. Many homeowners mistakenly believe small cracks are purely cosmetic.
How to fix: Use an epoxy injection kit for dry, non-moving cracks. For active leaks, polyurethane injections are better as they expand to fill gaps. In severe cases, consult a foundation repair specialist.
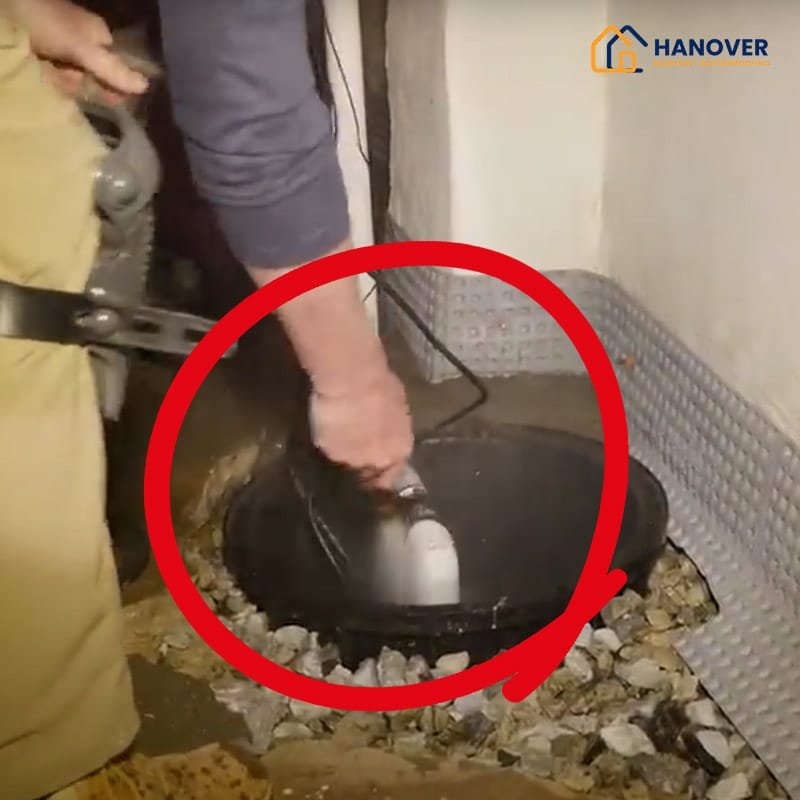
Improper Sump Pump Installation or Maintenance
Incorrect sump pump systems often lead to basement flooding, especially during heavy rains. Common errors include no backup power, poor float switch positioning, or inadequate basin size. In Hanover, where spring snowmelt and sudden rainstorms are common, these issues are critical.
How to fix: Install a battery backup, ensure the pump activates at the correct water level, and test it monthly. Replace pumps every 7-10 years depending on use and model quality.
Overlooking Interior Drainage System Needs
Absence or failure of an interior footing drain leaves water nowhere to go once it sleeps beneath the basement floor. Without this system, hydrostatic pressure builds until it forces water through floor-wall joints or cracks.
How to fix: Install a perimeter French drain system under the concrete slab, leading to a sump basin. Use perforated PVC piping wrapped in filter fabric to reduce clogging from soil or iron bacteria.
Mid-Level Waterproofing Mistakes That Escalate Long-Term Damage
Relying on Waterproof Paint Alone
Overdependence on interior waterproof coatings is a widespread but ineffective solution for serious moisture issues. Many homeowners apply waterproof paint thinking it will prevent basement leaks. However, these coatings merely mask symptoms and do not address the source of water infiltration.
Why it’s a mistake: Waterproof paint may temporarily block surface dampness, but it cannot withstand consistent water pressure or fix underlying structural faults. It also traps moisture inside walls, which can lead to peeling, bubbling, and mold growth.
How to fix: Use such coatings only as a supplementary solution after resolving exterior drainage, sealing cracks, and managing groundwater pressure effectively.
Incorrect or Incomplete Vapor Barrier Installation
Faulty vapor barrier systems contribute to persistent basement dampness and mold. Whether during construction or retrofit, if the barrier is applied on the wrong side or lacks sealing at seams and penetrations, moisture can accumulate inside the walls or flooring.
Why it’s a mistake: A vapor barrier must be positioned based on the climate and wall assembly. In Hanover’s mixed-humid climate, it should generally be on the interior side of walls but must allow for controlled drying.
How to fix: Use a Class II vapor retarder with permeable insulation like mineral wool. Seal all joints and overlaps with moisture-resistant tape and install it per building code recommendations.
Ignoring the Role of Soil Composition and Water Table
Neglecting native soil behavior during construction or landscaping leads to foundational strain and drainage problems. In Hanover, the presence of clay-rich soils means that water is retained longer, increasing hydrostatic pressure against basement walls.
Why it’s a mistake: Builders or homeowners who fail to adjust for local soil types risk recurring water ingress, even with basic drainage systems in place.
How to fix: Conduct a soil percolation test and consult with a geotechnical engineer if necessary. Add granular fill or install vertical drainage boards to reduce direct soil-wall contact where needed.
Failure to Install or Maintain Exterior Waterproofing Membrane
Omitting a dedicated exterior waterproofing layer is one of the most costly mistakes made during new builds or foundation repairs. Some builders rely solely on damp-proof coatings, which are insufficient to withstand constant moisture contact.
Why it’s a mistake: Without a membrane, moisture slowly permeates porous foundation walls, leading to efflorescence, wall staining, and structural weakening.
How to fix: Apply a rubberized asphalt membrane or sheet-based waterproofing system. Ensure the membrane wraps continuously across wall penetrations, footings, and transitions, with proper backfill and protective boards.
Instead of relying on minimal damp-proof coatings, explore foundation waterproofing methods that actually work and protect against long-term saturation.
Misplaced or Undersized Window Wells
Incorrectly installed basement window wells allow rainwater and surface runoff to pool, especially if they lack drainage or covers. Improper grading around these wells makes them funnels rather than barriers.
Why it’s a mistake: Standing water inside window wells eventually seeps into basement window frames, leading to rot, mold, and water damage.
How to fix: Use prefabricated window wells with built-in drains that connect to perimeter drainage systems. Install clear polycarbonate covers to block leaves and snow.
Advanced and Contractor-Related Mistakes That Compromise Waterproofing Systems
Blocking Foundation Vents or Improper Basement Ventilation
Insufficient basement ventilation traps humidity and accelerates moisture problems. In efforts to “seal the basement tight”, homeowners or renovators often close off essential air pathways or use incorrect insulation methods that stop airflow.
Why it’s a mistake: While insulation is necessary, improper air flow prevents moisture from escaping. Trapped humidity condenses on cold surfaces, encouraging mold growth behind walls, under flooring, or inside insulation.
How to fix: Ensure mechanical ventilation is in place with a dedicated exhaust fan or HRV (Heat Recovery Ventilator). Use dehumidifiers in humid months and avoid covering vents without alternative airflow planning.
Using Organic Materials for Basement Finishes
Installing drywall, wood studs, or carpet directly on concrete walls and floors is a frequent mistake in finished basements. Organic materials absorb and retain moisture, becoming breeding grounds for mildew and fungi when exposed to high humidity or small leaks.
Why it’s a mistake: Even when no visible leaks exist, vapor transmission through concrete can saturate organic materials over time.
How to fix: Use metal studs, closed-cell foam insulation, and vapor-resistant wall panels designed for basement use. For flooring, install subfloor systems with vapor barriers and opt for vinyl plank or tile instead of carpet or wood.
DIY Excavation Without Proper Wall Reinforcement
Untrained excavation and waterproofing attempts risk damaging the structural integrity of basement walls. In an effort to cut costs, homeowners may dig around the foundation to apply sealants without understanding load-bearing risks or drainage slope standards.
Why it’s a mistake: Digging too deep or unevenly can destabilize walls, footings, or surrounding soil. Improper sealing methods may also introduce moisture-trapping materials instead of solutions.
How to fix: Always consult structural engineers or licensed waterproofing contractors when planning exterior excavations. Use approved sealants and drainage panels as specified in regional building codes.
Underestimating Hydrostatic Pressure
Failing to account for groundwater buildup beneath or around a basement leads to long-term structural damage. Many systems are designed for surface water diversion but ignore what lies underneath.
Why it’s a mistake: Water under pressure pushes through the path of least resistance—floor-wall joints, slab cracks, or porous concrete. Over time, this damages finishes, degrades material bonds, and causes mold proliferation.
How to fix: Integrate both exterior and interior waterproofing systems. Install a below-slab drainage system and use a sump pump designed to relieve hydrostatic buildup. Ensure floor-wall joints are sealed using flexible, water-tolerant materials.
Hiring General Contractors Without Waterproofing Expertise
Choosing non-specialist contractors for waterproofing tasks often leads to shortcuts, misdiagnoses, and substandard material use. Waterproofing requires specialized knowledge of moisture migration, structural load, and local geology.
Why it’s a mistake: Even experienced general contractors may lack knowledge of Hanover-specific soil issues, climate factors, or code-compliant drainage methods. This often results in repeated repairs, inflated costs, or even structural compromise.
How to fix: Hire licensed waterproofing professionals with references in your local area. Verify warranty coverage, ask for detailed repair scope, and request moisture intrusion analysis prior to any sealing or excavation work.
Skip the risk—choose professional basement waterproofing services in Hanover that specialize in structural moisture protection.
A Holistic Approach to Basement Waterproofing in Hanover
Addressing basement waterproofing mistakes requires more than patchwork fixes. It demands a comprehensive understanding of soil behavior, moisture sources, material compatibility, and installation practices. For Hanover homeowners, the combination of older homes, seasonal rainfall, and clay soil makes it vital to plan and execute each step with accuracy. Avoiding these 12 common mistakes ensures long-term basement health, preserves property value, and minimizes recurring costs.
If you’re unsure where your system is vulnerable, consider a professional assessment. Preventative investment always costs less than structural repairs and mold remediation later.