Crawl Space Water Problems
Crawl space water problems affect thousands of homes, especially in humid or flood-prone regions. These issues arise when moisture or standing water enters through the foundation, walls, or ground. Over time, this can lead to wood rot, mold growth, pest infestation, and even foundation damage.
Early signs of water intrusion in a crawl space include:
- Musty or damp odors inside the home.
- Warped or buckling flooring above the crawl space.
- Visible condensation on pipes or insulation.
- Pooling water or mud in the crawl area.
Water can enter due to poor grading, clogged gutters, cracked foundation walls, or high groundwater levels. Regardless of the source, addressing this issue requires a methodical, three-step approach to ensure long-term dryness and structural protection.
Why Waterproofing Matters for Crawl Spaces
Crawl space waterproofing is essential for maintaining home structural integrity, improving indoor air quality, and reducing energy loss. A dry, sealed crawl space prevents wood framing from absorbing moisture, which can cause decay and reduce load-bearing capacity.
Moisture beneath a home also promotes the growth of airborne mold spores, which can be pulled into living areas through the stack effect. In regions like the Mid-Atlantic, including Hanover, PA, seasonal humidity and rainfall make preventive waterproofing an investment in both health and property value.
According to the Environmental Protection Agency (EPA), moisture control is one of the most critical factors in home air quality management [source: https://www.epa.gov/mold/brief-guide-mold-moisture-and-your-home].
Step One: Sealing Crawl Space Entry Points
The first and most critical step in crawl space waterproofing is sealing all visible and hidden entry points where water or humid air can infiltrate. This includes:
- Cracks in the crawl space foundation wall.
- Gaps around utility penetrations like pipes or electrical lines.
- Improperly vented or open crawl space access doors.
- Unsealed points at the rim joist where walls meet the subfloor.
Foundation cracks should be repaired using hydraulic cement or urethane-based injection foams. These materials expand within the crack, forming a watertight seal even under hydrostatic pressure.
Vent covers should be replaced or installed to prevent moist outside air from entering. In cold climates, insulated covers help prevent freezing pipes and thermal bridging.
For rim joist air sealing, apply closed-cell spray foam or caulk around the perimeter. This not only stops air leaks but also reduces insect entry and heat loss.
When sealing crawl space doors, ensure that the hatch is properly gasketed and secured with weather-resistant latches. Replace wooden doors that have begun to warp or decay.
Proper sealing creates the foundation for further moisture control. Without it, any internal drainage or encapsulation system will be compromised by ongoing intrusion from the exterior.
Step Two – Installing a Crawl Space Drainage System
The Role of Crawl Space Drainage Systems
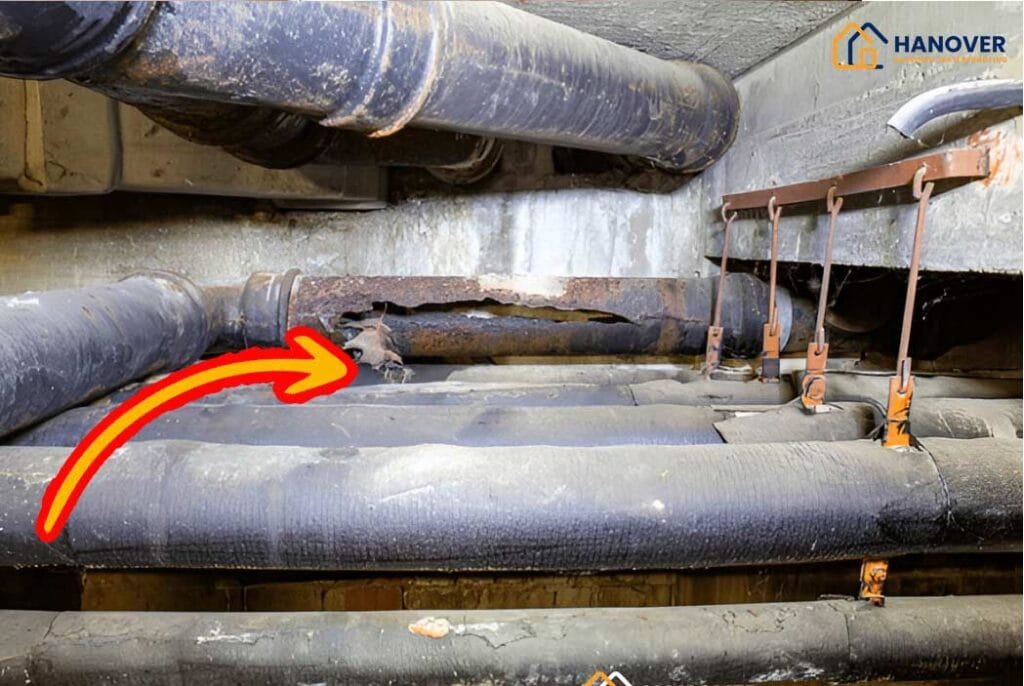
Crawl space drainage systems are designed to collect, redirect, and discharge both surface water and groundwater that may accumulate beneath your home. Once entry points are sealed, it is essential to control water that still penetrates the soil around the crawl space foundation. Even a well-sealed space can experience rising moisture or seepage through porous concrete.
Drainage installation prevents structural damage and keeps the air under your home dry and healthy. A well-installed system actively manages hydrostatic pressure and ensures that water flows away from the property, not into it.
Components of an Effective Drainage System
An effective crawl space drainage system typically includes the following elements:
- Interior French Drain System:
This is a trench filled with gravel and perforated pipe, placed around the interior perimeter of the crawl space. It collects water entering through the footing or foundation wall and redirects it toward a central collection point. The trench is covered with filter fabric to prevent clogging from soil or debris. - Sump Basin and Sump Pump:
Water collected by the French drain flows into a sump basin, where a sump pump automatically discharges it to a location outside the home. Pumps should include a check valve and a battery backup in regions prone to power outages. The discharge line must lead water at least 10 feet away from the foundation, ideally into a dry well or storm drain system. - Drainage Matting:
A dimpled drainage mat is placed over the crawl space floor beneath the vapor barrier. It creates a pathway for water to reach the drain system while supporting the liner. This prevents puddles from forming under the barrier and aids in water migration toward the sump. - Discharge Line and Exit Drainage:
The sump pump outlet connects to a rigid PVC discharge pipe that should be sloped properly and protected from freezing. It’s crucial to include an anti-freeze discharge line if your region experiences subzero temperatures.
In areas with clay soil or heavy rainfall, like Hanover, PA, a gravity-fed or hybrid French drain may be more effective. Local contractors may also recommend modifications to accommodate building codes or site-specific conditions such as sloped lots or high water tables.
Professional vs. DIY Drainage Installation
Installing a full drainage system can be a complex and labor-intensive task. For homeowners with technical knowledge, a DIY approach is possible using modular kits available at major hardware stores. However, for best performance and code compliance, a licensed contractor is often the better choice.
Professional installers conduct site grading assessments, evaluate water table depth, and ensure that the discharge system meets local runoff regulations. They can also help source higher-quality materials, such as cast-iron sump pumps or industrial-grade drain tile, which last longer and handle more water volume than consumer-grade kits.
Misplaced discharge lines or shallow trenches could be the reason why your basement keeps flooding even after installing a sump system.
Benefits of Proper Drainage Installation
- Eliminates standing water and prevents mold and mildew growth.
- Reduces humidity, helping preserve wood framing and insulation.
- Protects against foundation settlement by relieving water pressure.
- Increases home energy efficiency and air quality by keeping air drier.
- Helps comply with real estate inspections for home resale.
For long-term results and permit compliance, trust professional crawl space repair services backed by Hanover’s top-rated waterproofing experts.
Step Three – Encapsulating the Crawl Space for Permanent Moisture Control
Why Crawl Space Encapsulation is the Final and Most Permanent Step
Crawl space encapsulation is the process of fully enclosing the space beneath your home in a vapor-proof, airtight barrier system. This final layer locks out residual moisture, blocks ground vapors, and transforms the crawl area into a dry, controlled environment.
Encapsulation is crucial after sealing entry points and installing drainage. Without it, residual moisture from the soil and air can still affect insulation, ductwork, and the subfloor above. Encapsulation ensures long-term protection, making it the most durable defense against crawl space water issues.
Key Components of an Encapsulation System
A complete crawl space encapsulation system consists of several integrated layers and materials, each designed to reinforce moisture and air control:
- Vapor Barrier:
- The base of the system is a thick, puncture-resistant polyethylene vapor barrier. The most reliable types are reinforced 12 to 20 mil liners, with ratings for water permeability below 0.1 perms.
- The barrier should cover the entire crawl space floor, wrapping up the walls and around any piers or support columns.
- Seams are sealed with waterproof tape or adhesive, and the edges are mechanically fastened to prevent displacement.
- The base of the system is a thick, puncture-resistant polyethylene vapor barrier. The most reliable types are reinforced 12 to 20 mil liners, with ratings for water permeability below 0.1 perms.
- Wall and Pier Insulation:
- Crawl space walls are typically insulated using rigid foam board insulation, which resists water damage and retains thermal performance.
- Rim joists can be sealed with spray foam insulation, which both insulates and air-seals gaps.
- Crawl space walls are typically insulated using rigid foam board insulation, which resists water damage and retains thermal performance.
- Air and Vapor Sealing:
- Any remaining openings in the foundation, such as vent covers, access hatches, or pipe penetrations, must be sealed using foam sealants or gaskets.
- This prevents humid outdoor air or cold drafts from disrupting the conditioned space.
- Any remaining openings in the foundation, such as vent covers, access hatches, or pipe penetrations, must be sealed using foam sealants or gaskets.
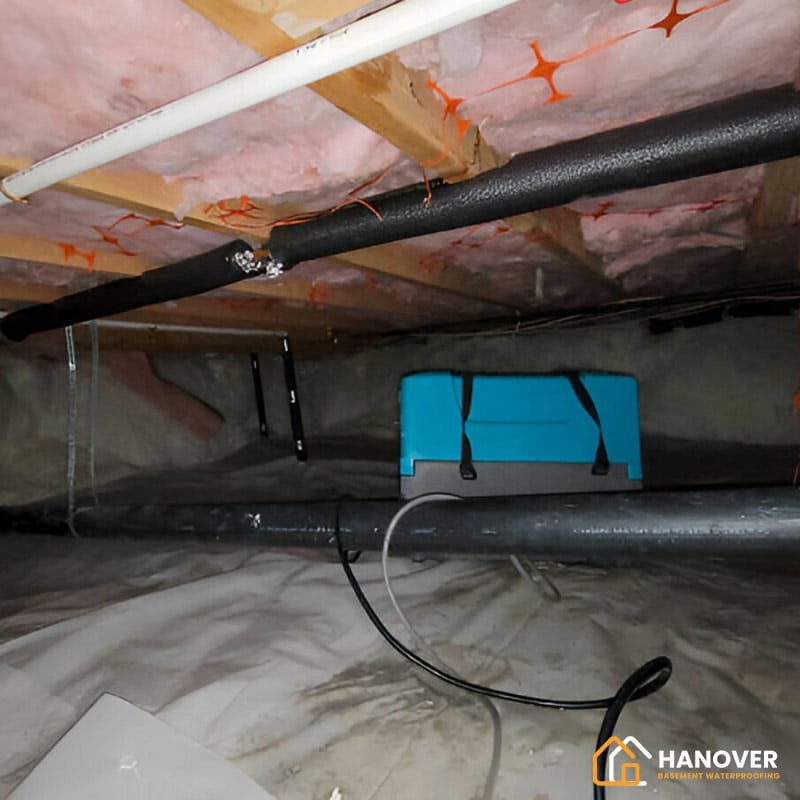
- Dehumidifier System:
- After encapsulation, a crawl space dehumidifier may be installed to maintain humidity levels below 60%.
- Units should include an automatic condensate pump to remove collected moisture through the sump system or dedicated drain line.
- After encapsulation, a crawl space dehumidifier may be installed to maintain humidity levels below 60%.
Advantages of Full Encapsulation
A fully encapsulated crawl space offers multiple long-term benefits:
- Blocks moisture from both the soil and outside air.
- Enhances HVAC performance by reducing duct condensation and energy loss.
- Prevents pest entry, as dry environments discourage insects and rodents.
- Improves home resale value, especially in moisture-prone zones like Hanover, PA.
- Complies with building codes and green certification standards, including ASHRAE and Energy Star guidelines.
Encapsulation is especially effective when paired with climate zone-specific modifications. For example, in humid continental climates, vapor barriers should be sealed to block both groundwater and ambient vapor diffusion, while ensuring ventilation pathways are maintained per local regulations.
When to Hire a Professional Encapsulation Contractor
While encapsulation kits are available for homeowners, professional installation offers key advantages:
- Use of commercial-grade liners and adhesives.
- Warranty-backed labor and material guarantees.
- Compliance with Hanover Township permitting and inspection requirements.
- Precision sealing around irregular structures and crawl layouts.
Certified installers often offer a moisture monitoring system or service plan to maintain your encapsulated crawl space over time.
Final Thoughts: The Complete Crawl Space Waterproofing System
Combining entry point sealing, drainage installation, and encapsulation creates a comprehensive system that:
- Keep your crawl space dry and mold-free.
- Improves the comfort and air quality inside your home.
- Protects the foundation and structural components.
- Adds long-term value and peace of mind for any homeowner.
Waterproofing your crawl space isn’t just a repair—it’s a transformation of your home’s most vulnerable area into one of its most protected.
FAQs
What materials are best for a vapour barrier in a crawl space?
The best materials for a vapour barrier are reinforced polyethene plastic sheets that are at least 6 mils thick. For extra durability, you can use thicker options like 10 mils or 20 mils. The material should be puncture-resistant and durable to provide long-lasting moisture control.
How long does a sump pump last, and how do I maintain it?
A sump pump typically lasts 7 to 10 years with proper maintenance. To extend its life, regularly check the pump to ensure it’s free of debris, test it by pouring water into the pit to see if it activates, and ensure the discharge pipe is clear. Also, consider installing a battery backup to keep it running during power outages.
Can I install a vapour barrier and sump pump myself?
Yes, both a vapour barrier and a sump pump can be installed by a DIYer, but it requires some knowledge and proper tools. You need to measure your crawl space for the vapour barrier and securely seal the edges. Installing a sump pump involves digging a pit, placing the pump, and connecting it to a drainage system. Hiring a professional may be a better option if you’re unsure or want the job done efficiently.
How do I know if my crawl space needs waterproofing?
Look for signs like musty odours, visible water stains, damp insulation, mould growth, or pests. If you experience these symptoms, your crawl space likely needs waterproofing. You can also inspect the area after heavy rain to see if water accumulates or the humidity level is too high.
Can I combine these waterproofing steps with other home improvements?
Waterproofing can be done alongside other home improvements, like insulation upgrades or energy efficiency projects. Sealing cracks and improving drainage can also help enhance the effectiveness of any home improvement work, especially if you’re planning to install new floors or replace insulation.