What is the Crawl Space Encapsulation?
Crawl space encapsulation is the process of sealing the crawl space beneath a home to prevent moisture infiltration, control indoor air quality, and improve energy efficiency. A properly encapsulated crawl space includes vapor barriers, insulation, sealing systems, and sometimes dehumidification units. This system creates a dry, stable environment that protects the home’s structural integrity and lowers the risk of mold, mildew, and pests.
In moisture-prone climates such as Hanover, Pennsylvania, encapsulation is not just a recommendation—it’s a preventative measure. Hanover lies in a region with humid summers, cold winters, and moderate to high rainfall. These conditions increase the importance of selecting region-appropriate materials that meet or exceed code standards.
Why Material Selection Matters
The effectiveness of encapsulation heavily depends on the quality and durability of the materials used. Inferior materials may tear, absorb moisture, or fail to block water vapor, rendering the entire system ineffective. Choosing high-grade materials ensures:
- Long-term moisture protection
- Energy savings on heating and cooling
- Improved indoor air quality
- Protection against wood rot and structural damage
Learn more about our crawl space repair services in Hanover for sealing, reinforcement, and code-compliant upgrades.
Best Vapor Barrier Materials
Vapor barriers are the foundation of encapsulation. These are installed on the floor and sometimes walls of the crawl space to prevent ground moisture from evaporating into the air.
Polyethylene Sheeting
Polyethylene sheeting is the industry standard for vapor barriers. It is durable, resistant to tears, and available in various thicknesses. For residential encapsulation, 12-mil to 20-mil reinforced polyethylene sheets are recommended.
- 12-mil liners are suitable for homes with low to moderate moisture exposure.
- 20-mil reinforced liners offer the highest durability, making them ideal for high-moisture environments or frequent foot traffic.
The reinforced versions include polyester scrim layers that add tensile strength and resistance to puncture. Reinforced polyethylene is especially effective in Hanover’s flood-prone areas or for crawl spaces that need occasional access for maintenance.
Verified Supplier: Crawlspace Depot – Vapor Barriers
Class A Vapor Retarders
For code compliance in Hanover and across Pennsylvania, many contractors opt for Class A vapor retarders. These materials meet fire resistance and moisture permeance standards defined by ASTM E1745. Class A products are commonly mandated in encapsulation permits and are ideal for sealed environments near combustible materials or HVAC systems.
Choosing Liner Thickness
The thickness of a vapor barrier influences its ability to resist puncture and block water vapor. Thicker liners offer more durability but may be harder to install in tight spaces.
- 6-mil liners are light-duty and often used as temporary moisture covers.
- 10-mil to 12-mil liners balance durability with ease of installation.
- 15-mil and 20-mil liners offer superior resistance to water vapor, tears, and punctures. These are the preferred choice for permanent encapsulation systems.
For properties in Hanover where flooding or groundwater seepage is common, a 20-mil liner with reinforced scrim is the safest and most cost-effective option over time.
Where and How to Install Vapor Barriers
Install vapor barriers across the entire floor of the crawl space, overlapping and sealing the edges with butyl tape or sealant mastic. Extend the liner partially up the walls—typically 6 to 12 inches—and fasten it using mechanical fasteners or specialized poly fasteners. In wall encapsulations, it’s often beneficial to use foam board insulation behind the liner for added thermal resistance.
Make sure that all joints are overlapped by at least 6 inches and sealed to prevent leaks. For Hanover homes near sloped terrain or high groundwater tables, consider installing drainage matting beneath the vapor barrier to allow water movement without compromising the barrier.
Insulation Materials, Sealing Systems, and Moisture Control Methods
Effective Insulation Materials for Encapsulated Crawl Spaces
Insulation plays a crucial role in regulating temperature and preventing condensation in the crawl space. In encapsulated systems, it must resist moisture absorption, remain durable under fluctuating temperatures, and be compliant with local codes.
Rigid Foam Board Insulation
Rigid foam board insulation, such as polyisocyanurate (polyiso) or extruded polystyrene (XPS), is one of the best choices for crawl space walls. These boards offer high R-values, resist mold growth, and maintain their form over time.
- Polyiso boards deliver the highest R-value per inch and are ideal for walls needing maximum thermal resistance.
- XPS boards are more moisture-resistant and offer a solid balance between durability and cost.
Foam boards should be installed directly onto the interior foundation walls. Seal all seams using foil tape or spray foam to block thermal bypass and air leakage.
Closed-Cell Spray Foam Insulation
Closed-cell spray foam is highly effective for sealing tight corners, rim joists, and hard-to-reach areas. This material expands upon application, creating an airtight and moisture-resistant seal. It also adds structural support to framing.
For Hanover homes where freeze-thaw cycles occur, spray foam insulates against subfloor cold spots and reduces the chance of pipe freezing. However, it should be installed by certified professionals due to its chemical curing process and safety requirements.
Sealing the Crawl Space Envelope
Beyond vapor barriers and insulation, it is critical to seal all air gaps to prevent infiltration of outside air, pests, or moisture. This step enhances energy performance and prolongs the lifespan of materials.
Sealing Vents and Access Points
In encapsulated crawl spaces, foundation vents should be sealed permanently to maintain environmental control. Use foam board or rigid insulation panels cut to size and sealed with spray foam or mastic.
Access doors should be insulated and weather-stripped. Installing a pre-insulated crawl space door panel improves airtightness and simplifies code compliance.
Air and Duct Sealing
All plumbing, HVAC, and electrical penetrations should be sealed with caulk or one-part spray foam. Unsealed ductwork contributes to energy loss and moisture imbalance. In Hanover homes where HVAC systems often run year-round, duct sealing is an essential step toward achieving stable indoor air quality.
Moisture Management Systems
Controlling moisture is the backbone of encapsulation. Even the most advanced liners and insulation will fail if water ingress is not controlled through passive and active moisture management.
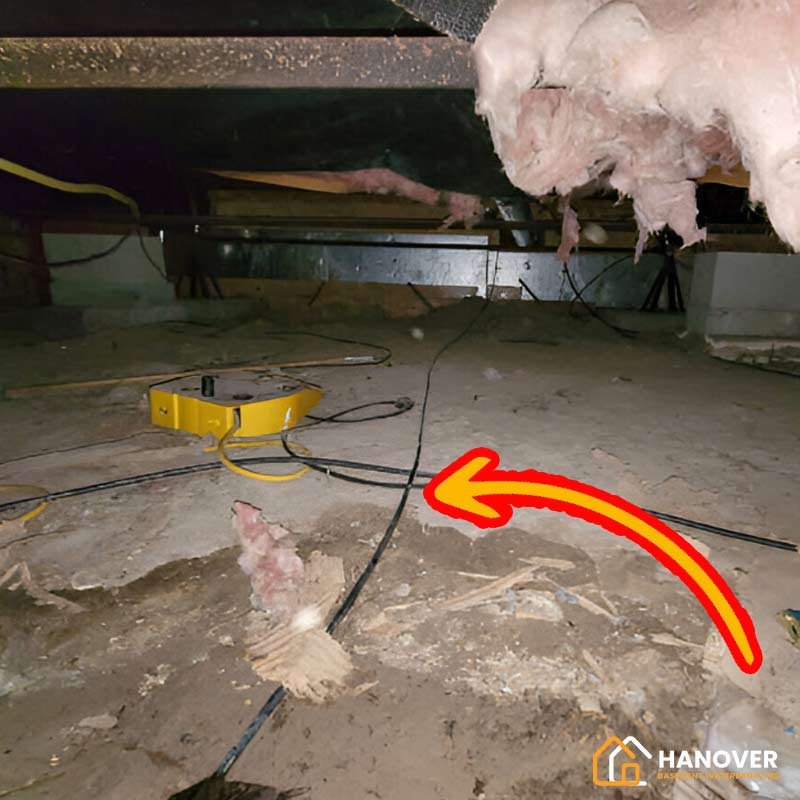
Drainage Matting and Floor Channel Systems
Drainage matting is installed under the vapor barrier to promote sub-barrier airflow and water movement. It is particularly useful in homes with sloped crawl space floors or those located in flood-prone zones of Hanover. Floor channels direct water toward sump pumps without saturating the liner.
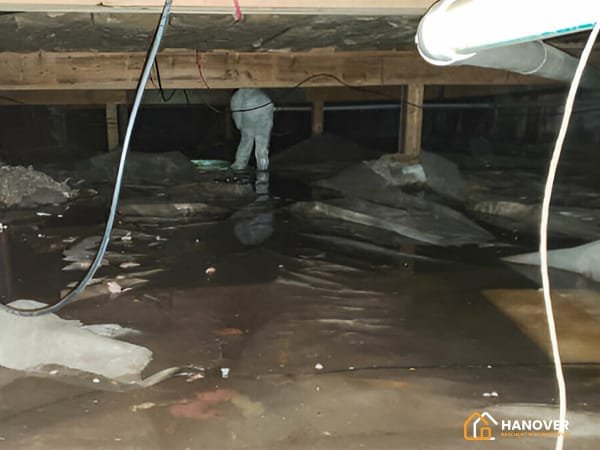
Sump Pumps for Groundwater Control
A sump pump system is recommended for crawl spaces where groundwater intrusion is observed. The pump is placed in a sump basin located at the lowest point of the crawl space. It activates automatically to remove water before it rises above the barrier level.
- Use models with battery backup for reliability during power outages.
- Pair the system with a check valve to prevent backflow.
Dehumidifiers for Long-Term Moisture Regulation
An encapsulation-grade dehumidifier maintains indoor relative humidity below 60%, which inhibits mold growth and protects wooden framing. Select a dehumidifier based on:
- Cubic footage of the crawl space
- Drainage options (gravity vs. pump)
- Humidity sensor precision
Install the dehumidifier with an automatic condensate pump for continuous operation. For Hanover’s humid summers and variable winter conditions, set humidity targets between 45–55%.
Recommended Product Line: Santa Fe Dehumidifiers
We offer professional crawl space dehumidifier installation to control Hanover’s seasonal humidity with precision.
Code Compliance, Cost-Benefit Analysis, Installation Sequencing, and Final Recommendations
Code Compliance and Local Regulations in Hanover, PA
Adhering to local building codes ensures both safety and legality in crawl space encapsulation. Hanover follows Pennsylvania’s statewide adoption of the International Residential Code (IRC), particularly sections that govern foundation moisture control and ventilation.
Key Code Provisions
- IRC R408.3 requires that the ground be covered with a vapor retarder when vents are closed.
- IRC R408.2 Exception 4 allows unvented crawl spaces if a continuously operated mechanical dehumidification or conditioning system is installed.
- Insulation must meet R-value minimums specified by Zone 5 standards, which apply to Hanover. Wall insulation typically requires R-10 continuous or R-13 cavity insulation.
For homeowners, this means selecting materials like Class A vapor barriers, closed-cell insulation, and mechanical dehumidifiers to ensure full compliance.
Permit and Inspection Process
In most cases, encapsulation work in Hanover requires a building permit, especially when:
- Structural changes are made.
- Mechanical systems like dehumidifiers or sump pumps are installed.
- Insulation or electrical work is included.
Homeowners should consult the Hanover Borough Code Enforcement Office before starting the project. Inspections may be required both before and after installation to confirm compliance with moisture, insulation, and mechanical system standards.
Building Code Reference: Hanover Borough Building & Zoning
Cost-Benefit Analysis of Crawl Space Encapsulation
Encapsulation involves upfront investment, but delivers long-term benefits that outweigh costs in most residential scenarios—especially in humid or flood-prone regions like Hanover.
Typical Costs
- Vapor barriers: $0.50–$1.50 per square foot for material alone.
- Insulation: $1.00–$3.50 per square foot (closed-cell spray foam on the higher end).
- Dehumidifiers: $800–$2,000 for high-capacity units.
- Labor: $2,000–$5,000 depending on crawl space size and site conditions.
Long-Term Savings
- Energy efficiency: Up to 20% reduction in HVAC costs.
- Reduced repairs: Preventing mold, wood rot, and insulation degradation.
- Increased home value: Encapsulation is a selling point in real estate, particularly in Hanover’s older homes where moisture issues are common.
A fully encapsulated crawl space can return its cost within 3–5 years through utility savings and structural preservation.
Recommended Installation Sequence
Ensuring proper installation sequencing is crucial to system performance. Below is the step-by-step approach:
- Remove debris and existing insulation from the crawl space.
- Seal all exterior vents and wall penetrations with foam board and spray foam.
- Install drainage matting, if needed, on the crawl space floor.
- Lay down the vapor barrier, overlapping seams and sealing edges.
- Extend the vapor barrier up foundation walls and fasten securely.
- Apply wall insulation, either with foam board or closed-cell spray foam.
- Install a dehumidifier and sump pump, if required.
- Test and inspect the system for leaks, airflow, and humidity control.
Following this structured process ensures that each component supports the others and that the system is compliant and durable.
Final Recommendations for Homeowners
Encapsulating your crawl space is one of the most effective investments you can make for home durability, health, and efficiency—particularly in a climate like Hanover’s. Choosing the right materials involves considering not only upfront costs but long-term performance, local building codes, and environmental demands.
Key takeaways:
- Use reinforced 12-mil to 20-mil vapor barriers for floor coverage.
- Choose Class A retarders and closed-cell insulation for walls and joists.
- Incorporate a high-capacity dehumidifier to maintain air quality.
- Follow Hanover’s zoning rules and schedule inspections to ensure full code compliance.
Visit our guide to crawl space moisture control services in Hanover for pricing, systems, and long-term solutions.
Homeowners are encouraged to work with experienced contractors familiar with Hanover’s conditions or use verified encapsulation kits that meet state specifications. For those considering DIY, begin by auditing your crawl space for water intrusion, air gaps, and existing damage before purchasing materials.
When done correctly, crawl space encapsulation transforms a neglected area into a performance-enhancing asset for the entire home.
FAQs
What is the best material to use for crawl space encapsulation?
The best material is a thick, reinforced polyethylene vapor barrier—preferably 12 to 20 mil. It blocks moisture and holds up over time.
How thick should my vapor barrier be?
For most homes, 12 mil is good. In wet or high-traffic areas, 20 mil is better. Thicker barriers last longer and resist damage.
Can I encapsulate my crawl space myself?
Yes, if your crawl space is dry and in good shape. But for damp or moldy spaces, it’s safer and more effective to hire a pro.
Is insulation needed during encapsulation?
It depends on your climate. In colder areas, rigid or spray foam insulation helps save energy and keeps floors warmer.
How long does crawl space encapsulation last?
When done right with quality materials, it can last 20 years or more. Regular inspections help keep it in top shape.
Will encapsulation stop mold growth?
Yes, if it’s sealed properly and the space stays dry. Adding a dehumidifier helps control moisture and prevent mold in the long term.