Why Mold in Your Crawl Space Is a Serious Problem
Mold in crawl spaces is not just an eyesore—it represents a health hazard, a structural risk, and a sign of moisture failure in your home’s foundation system. Mold spores thrive in dark, damp environments where relative humidity remains above 60%. If left unchecked, this can lead to:
- Rotting subfloor joists
- Poor indoor air quality
- Increased allergies and respiratory issues
- Property devaluation
According to the Environmental Protection Agency (EPA), mold can begin to grow within 24 to 48 hours of water exposure, especially in areas with poor ventilation and organic building materials like wood or paper-backed insulation. Source: EPA Mold Basics
10 Ways to Prevent Mold in Your Crawl Space & Keep It Dry
1. Install a High-Capacity Crawl Space Dehumidifier
A dehumidifier for crawl spaces is your first line of defense against high moisture content. These devices extract excess water vapor from the air, keeping the relative humidity in the safe zone of 45–55%.
Why it works
Crawl spaces in areas like Hanover, PA face fluctuating seasonal humidity, especially in spring and summer months. The humid air from outside can seep through vents or unsealed gaps, raising moisture levels. A high-capacity dehumidifier, such as the Santa Fe Compact70, is designed for low-clearance environments and can remove up to 70 pints per day of moisture.
Best practices
Place it centrally to maximize air circulation.
Ensure your dehumidifier drains into a sump pump basin or via gravity-fed hose to the exterior.
Use a unit with automatic humidity controls.

2. Seal the Crawl Space with a Vapor Barrier (Encapsulation)
Crawl space encapsulation involves covering all exposed earth, walls, and piers with a heavy-duty polyethylene liner. This prevents ground moisture from evaporating into the crawl space air.
Benefits
- Stops soil vapor from rising into the home.
- Reduces mold growth, wood rot, and metal corrosion.
- Improves energy efficiency by insulating the subfloor environment.
A vapor barrier system should include:
- Overlapping and sealed seams
- Perimeter anchoring
- Mechanical fastening to walls and pillars
- At least 6-mil thickness (ideally 12–20 mil)
For insulation specifics and climate-zone recommendations, refer to our full crawl space encapsulation insulation guide for Hanover homeowners.
3. Close or Block Crawl Space Vents (in Mixed-Humid Climates)
While venting was once thought essential, building science has evolved. In mixed-humid zones like Pennsylvania, vented crawl spaces often draw in humid outside air, especially in the summer, which can condense on cooler subfloor surfaces and feed mold growth.
Recommendations
- Seal off exterior vents using rigid foam insulation or mortar blocking.
- Redirect fresh air intake through conditioned air or dehumidified return.
When properly encapsulated, vented crawl spaces can be converted to closed systems to maintain a dry, controlled environment.
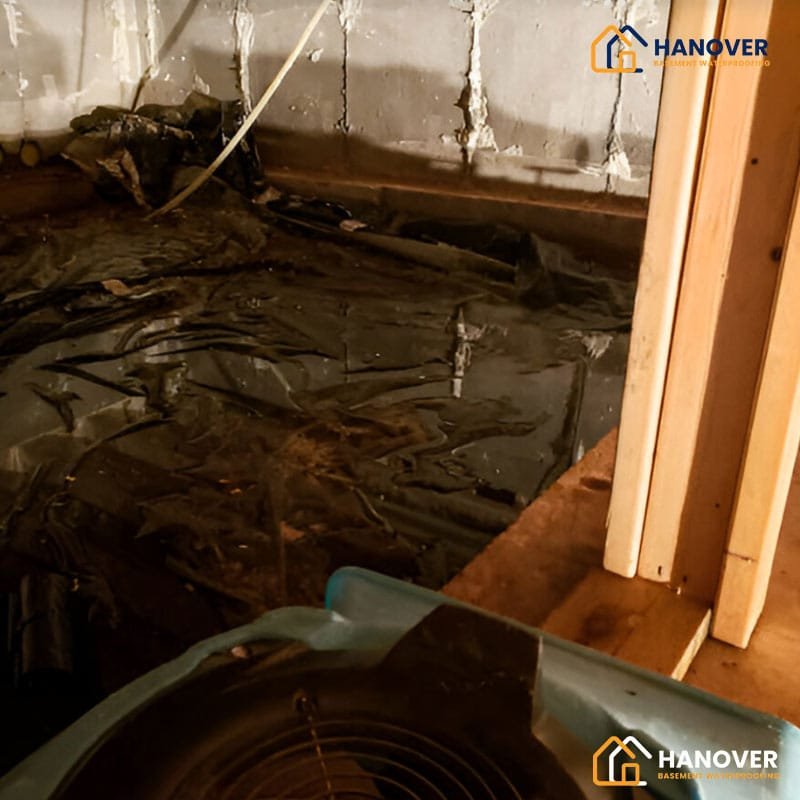
4. Install a Sump Pump to Remove Groundwater
If your crawl space collects standing water or seasonal flooding, a sump pump system is essential. Water pooling around the footings or foundation slab can lead to high ambient moisture and capillary rise through porous concrete or block.
Installation notes
- Excavate a sump basin in the lowest part of the crawl space.
- Use a submersible pump rated for 1/3 HP or higher.
- Include a check valve and discharge pipe routed away from the house.
For added security, include a battery backup system to ensure functionality during power outages, which often coincide with heavy rains.
5. Improve Exterior Drainage Around Your Home
Grading and gutter systems are often overlooked but critical. Poor exterior drainage leads to water pooling around the foundation, eventually seeping into the crawl space.
Key measures
- Ensure soil slopes away from your foundation at a minimum grade of 6 inches over 10 feet.
- Install or maintain downspout extensions that discharge water at least 10 feet from the foundation.
- Keep gutters clean and functioning to prevent overflow and perimeter saturation.
6. Insulate Crawl Space Walls — Not Just the Subfloor
Many homeowners mistakenly insulate only the floor above the crawl space, leaving the crawl space walls exposed. However, modern building science—especially in climate zone 4A, which includes Hanover, PA—recommends insulating the foundation walls of a sealed, conditioned crawl space.
Why this matters
- Foam board insulation or spray foam applied to crawl space walls stabilizes temperature.
- It helps prevent condensation, which is a precursor to mold.
- It lowers heating and cooling costs by creating a thermal boundary.
Implementation
- Use rigid foam board (R-10 minimum) or closed-cell spray foam.
- Extend insulation down to the top of the footing.
- Seal all joints with tape or spray sealant to create a continuous thermal and air barrier.
Avoid fiberglass batts in the crawl space, as they absorb moisture and attract pests.
7. Seal HVAC Ducts Running Through Crawl Space
If your home has ductwork running through the crawl space, any air leaks can:
- Introduce humid air
- Cause negative pressure differentials
- Disrupt HVAC performance
- Increase mold-promoting condensation
Sealing Strategy
- Use foil-backed butyl tape, not duct tape, for sealing joints.
- Insulate ducts with R-8 duct wrap or equivalent.
- Ensure all registers are airtight and that there are no disconnected elbows or supply lines.
Well-sealed ductwork preserves indoor air quality and reduces the risk of moisture migration.
8. Integrate Termite Shields and Pest Barriers with Moisture Controls
Moisture attracts pests, especially wood-destroying organisms like termites, carpenter ants, and certain mold-friendly beetles. When sealing a crawl space, it’s critical to integrate insect protection into your strategy.
Best practices
- Install metal termite shields between foundation walls and wooden framing members.
- Keep a visible inspection gap (typically 3 inches) between the top of the vapor barrier and bottom of framing to meet pest inspection codes.
- Treat the soil around the perimeter with a termite barrier product, if permitted in your region.
These steps work in tandem with mold prevention to protect the overall structure of the home.
9. Use Mold-Resistant Materials for Repairs and Upgrades
Whenever replacing damaged materials in your crawl space, always opt for mold-resistant products. This proactive approach ensures that minor leaks or condensation do not immediately lead to fungal growth.
Recommended materials
- Mold-resistant drywall (e.g., fiberglass-faced or paperless gypsum board)
- Treated lumber for framing elements exposed to potential moisture
- PVC-based insulation supports or synthetic fasteners
- Concrete backer board for any finish-grade elements
Use products rated by ASTM D3273 or labeled “mold-resistant” by building code compliance organizations.
10. Perform Regular Crawl Space Inspections and Seasonal Maintenance
A well-sealed crawl space is not maintenance-free. Regular inspections and seasonal checkups are essential to ensure long-term dryness and mold prevention.
Crawl space checklist
- Check humidity levels with a hygrometer (target < 60%)
- Inspect for condensation on ducts and joists
- Ensure dehumidifiers are operational
- Look for pest activity or water intrusion after storms
- Clean and flush sump pumps and drain lines twice per year
In Hanover, PA, conduct a spring inspection after snowmelt and a fall inspection before heavy rain season
Integrated Mold Prevention Pays Off
The best mold control approach combines:
- Mechanical solutions (dehumidifiers, sump pumps)
- Material upgrades (insulation, vapor barriers)
- Seasonal diligence (monitoring, maintenance)
A dry, sealed, and protected crawl space improves not only air quality and energy efficiency but also your home’s resale value and foundation lifespan.
DIY vs. Hiring a Professional: When to Call for Help
While many steps in crawl space mold prevention are accessible to skilled DIY homeowners, some situations warrant professional evaluation and execution.
Hire a professional if:
- You discover black mold or large areas of visible growth.
- The crawl space has standing water or chronic flooding.
- Structural elements like joists or sill plates show signs of rot or termite damage.
- You need full encapsulation with sump and drainage integration.
Look for licensed contractors who specialize in:
- Crawl space encapsulation
- Mold remediation
- Foundation drainage
Verify certifications from entities like the Institute of Inspection, Cleaning and Restoration Certification (IICRC) or National Association of Waterproofing and Structural Repair Contractors (NAWSRC).
Some moisture issues require trained evaluation—consider professional crawl space repair services if standing water or wood rot is present.
What to Expect in Terms of Cost
Costs vary depending on the size of the crawl space, extent of the moisture problem, and whether you go DIY or professional.
Typical ranges:
- Dehumidifier: $900 – $1,600 (plus install if needed)
- Vapor barrier materials: $0.50 – $0.90 per sq. ft.
- Encapsulation system (professionally installed): $4,000 – $15,000+
- Sump pump with drainage system: $1,500 – $3,500
- Annual inspections or tune-ups: $150 – $300
In Hanover, PA, pricing may fluctuate based on local contractor demand and regional building codes. Always request multiple quotes and ask for detailed scopes of work before signing.
Regional Considerations for Hanover, Pennsylvania
Hanover’s humid continental climate and older housing stock create conditions ripe for crawl space moisture issues:
- Spring thaw and late-summer humidity contribute to persistent ground dampness.
- Many homes built before the 1980s lack proper encapsulation or drainage.
- Local soils tend to have clay-rich content, which slows drainage and holds water near the foundation.
Tips for Hanover homeowners:
- Prioritize vapor barrier thickness due to seasonal groundwater shifts.
- Opt for dehumidifiers with frost control features to handle colder months.
- Check municipal regulations or call your York County building inspector for insulation and pest control codes.
Final Mold Prevention Checklist
Before you wrap up your mold-proofing project, confirm the following:
- Crawl space is completely covered with sealed vapor barrier
- All vents are closed or sealed if in a mixed-humid zone
- A working dehumidifier is installed and monitored
- Drainage is managed via graded landscape and sump system
- Walls are insulated with moisture-resistant materials
- HVAC ducts are sealed and insulated
- Periodic inspection schedule is in place (twice yearly)
- Mold-resistant building materials used in any repair
Protect Your Foundation from the Ground Up
A clean, dry, and well-sealed crawl space isn’t just about preventing mold—it’s a fundamental step in maintaining the structural integrity, air quality, and resale value of your home. By combining climate-aware upgrades, ongoing monitoring, and proper materials, Hanover homeowners can ensure long-term protection from mold and moisture damage.
FAQs
1. What causes mould to grow in a crawl space?
Mold thrives in dark, damp environments. High humidity, poor ventilation, leaks, and standing water create the perfect conditions for mould growth in a crawl space.
2. How can I tell if my crawl space has mould?
Common signs include a musty odour, visible mould growth, increased humidity, warped wood, sagging floors, and worsening allergies inside your home.
3. Can mould in a crawl space affect indoor air quality?
Yes. About 40% of the air in your home comes from your crawl space, meaning mould spores can travel upward, affecting indoor air quality and causing health issues like allergies and respiratory problems.
4. What is the best way to prevent mould in my crawl space?
The best prevention methods include:
- Installing a vapour barrier to block ground moisture.
- Using a dehumidifier to keep humidity below 50%.
- Sealing vents and fixing leaks to prevent water intrusion.
- Ensuring proper drainage around your home.
5. Should I keep my crawl space vents open or closed?
Sealing vents is generally better. Open vents allow humid air, pests, and moisture inside, increasing the risk of mould. Instead, a dehumidifier and encapsulation are used for moisture control.
6. Is it safe to remove the crawl space mould me?
DIY mould removal using a commercial cleaner or vinegar solution may work for small areas. However, hiring a professional for safe removal is best if mould covers a large area or has caused damage.
7. How much does preventing or removing mould from a crawl space cost?
Preventative measures like a vapor barrier and dehumidifier cost between $500 and $3,000, while professional mould remediation, depending on severity, can range from $1,000 to $5,000.
8. Will a dehumidifier alone prevent mould growth?
A dehumidifier helps control moisture but isn’t a complete solution. Pair it with a vapour barrier, proper drainage, and regular inspections for the best protection.
9. How often should I check my crawl space for mould?
Inspect your crawl space at least twice a year, especially after heavy rain or during humid seasons, to catch mould growth early.
10. What is crawl space encapsulation, and is it worth it?
Encapsulation involves sealing the crawl space with a vapour barrier, closing vents, and adding a dehumidifier. It’s a long-term solution that prevents moisture, improves air quality, and reduces mould risks, making it a worthwhile investment for most homeowners.