Causes of Foundation Wall Damage
Foundation wall damage typically stems from external environmental forces acting on the structure over time. The most common contributor is hydrostatic pressure, which builds up when groundwater accumulates around the foundation and presses against the walls. Over time, this pressure can lead to horizontal cracking, bowing, and even wall collapse if not addressed. Poor soil drainage, improper grading, and clogged downspouts exacerbate the issue by allowing water to pool near the base of the structure.
Another critical factor is frost heave, especially in regions like the Mid-Atlantic, including Hanover, PA, where freeze-thaw cycles expand and contract the soil seasonally. This repeated stress causes shifting, settlement, or cracking in the foundation. Additionally, expansive clay soils, which are prevalent in parts of Pennsylvania, can expand during wet conditions and shrink during dry spells, exerting alternating pressure on the wall.
Importance of Exterior Foundation Inspection
Before initiating any repairs, conducting a comprehensive exterior foundation inspection is essential. This process should include checking for visible cracks, water stains, bulging walls, and gaps between the wall and the soil line. It’s equally important to observe the drainage conditions around the property, particularly whether water pools after rainfall or snowmelt.
Professional inspections may use laser level measurements or plumb bob assessments to determine the degree of wall displacement. In some cases, soil analysis might be necessary to identify clay content, porosity, and water retention properties, which directly impact repair planning.
For homeowners unsure of how to proceed, organizations like the American Society of Home Inspectors (ASHI) offer certified professionals who can perform reliable evaluations. You can learn more at www.homeinspector.org.
Surface-Level Repair Techniques for Minor Foundation Wall Damage
When damage is identified early, surface-level repair techniques can be both cost-effective and structurally sufficient. The most common method is crack injection, which involves filling non-structural cracks with materials such as epoxy or polyurethane foam. While epoxy restores structural integrity, polyurethane is better suited for water-sealing applications. These methods are appropriate for hairline fractures, settling cracks, or seepage leaks that haven’t compromised the wall’s load-bearing function.
Another widely used method is parging, a masonry technique that involves applying a coat of cement-based mortar to the surface of the foundation wall. This method helps smooth out imperfections, improves water resistance, and acts as a physical barrier against the elements. However, parging should always be paired with waterproofing membranes or sealants to prevent long-term deterioration.
In areas like Hanover, where freeze-thaw impact is high, elastomeric coatings are often recommended due to their ability to flex with seasonal movement. These coatings form a watertight seal and resist cracking even when the underlying wall expands or contracts slightly.
Drainage and Grading Corrections to Prevent Future Damage
Repairing the wall alone won’t solve the problem unless the underlying water issues are addressed. Effective drainage system installation is critical to prevent recurrence. This may involve extending gutter downspouts to discharge at least 10 feet from the home, installing French drains to divert groundwater away from the foundation, or improving landscape grading so that the soil slopes away from the structure by at least 5% over 10 feet.
For regions with poor soil drainage, swales and catch basins can also redirect runoff. In clay-heavy soils, drainage mats may be installed between the wall and soil to maintain an air gap and reduce moisture absorption. According to the International Association of Certified Home Inspectors (InterNACHI), proper drainage is the most effective long-term strategy for preserving foundation integrity.
Poor soil slope or clogged downspouts may be the reason why your basement keeps flooding even after cosmetic wall patching.
When to Use Sealants and Surface Waterproofing Products
Waterproofing sealants play a crucial role in foundation wall protection, particularly in climates with high rainfall or variable moisture levels. These products typically include bituminous coatings, silicate-based densifiers, and polyurethane membranes, each suited to different wall materials and exposure types. For masonry walls, breathable sealants allow moisture vapor to escape while preventing water intrusion. This is essential to avoid trapping moisture inside the wall, which can lead to efflorescence or freeze-induced spalling.
Sealants should always be applied to clean, dry surfaces free of previous coatings or efflorescence. In many cases, surface preparation using pressure washing or mild acid etching is required. Multiple coats may be needed for long-lasting protection, particularly when using acrylic or polymer-based formulas.

Advanced Repair Solutions for Exterior Foundation Walls
Structural Reinforcement for Compromised Foundation Walls
When exterior wall damage extends beyond surface-level cracks or seepage, structural reinforcement becomes necessary. A compromised wall—marked by horizontal cracking, bulging, or visible deflection—can no longer support external loads safely and must be stabilized to prevent collapse.
One of the most effective reinforcement strategies is the use of carbon fiber straps, which are bonded vertically along the foundation wall to counteract inward movement caused by soil pressure. These straps are incredibly strong, minimally invasive, and capable of withstanding high tensile loads. They are ideal for reinforcing block walls with minor to moderate bowing (typically up to 2 inches of deflection). Their ease of installation and compatibility with both interior and exterior applications make them a top choice for quick but lasting reinforcement.
For walls with more pronounced deflection—especially those bowing more than 2 inches—steel I-beams (also known as wall braces) may be necessary. These beams are installed vertically and anchored into both the floor slab and joists, effectively holding the wall in position. In some cases, helical tiebacks are drilled horizontally through the wall and into the soil beyond to provide lateral restraint. These anchors offer substantial support and are especially suited for sites with clay-rich soils that tend to expand under moisture pressure.
Wall Stabilization Using Anchor Systems
Severe wall failure often calls for more robust stabilization via anchor systems. Wall plate anchor systems, for example, involve mounting steel plates on the interior side of the wall and connecting them to ground anchors buried several feet away in the yard. These systems use adjustable rods to pull the wall back toward plumb over time.
An advantage of wall anchor systems is their minimal impact on the exterior landscape compared to full excavation. They are also adjustable, allowing for incremental wall realignment over months without major reconstruction. This method is commonly used in areas like southern Pennsylvania, where heavy rainfall and seasonal saturation destabilize aging foundations in older homes.
While effective, these systems do require adequate yard space and stable subsoil conditions to function optimally. Soil analysis is recommended before implementation, especially in urban areas with limited access or heterogeneous fill soil.
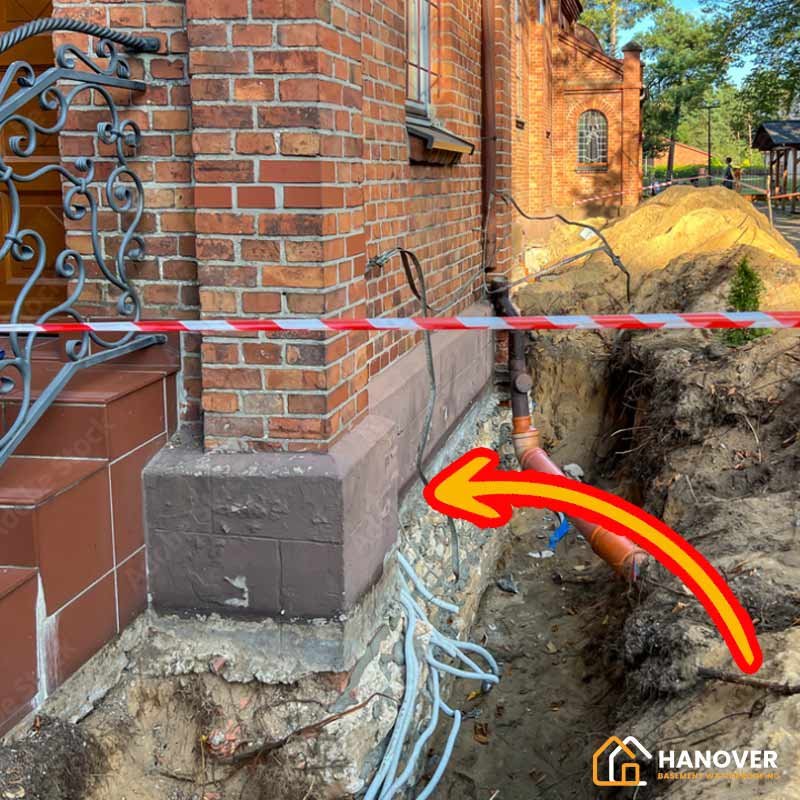
Exterior Excavation and Foundation Wall Reconstruction
In situations where the wall is structurally failing or heavily bowed, full excavation and wall rebuild may be the only long-term solution. This process begins by removing the soil along the entire affected wall section down to the footer level. Once exposed, the wall is inspected for core integrity. In cases of extreme deterioration, damaged portions are demolished and rebuilt using reinforced concrete, concrete masonry units (CMUs), or poured wall forms.
Before the new wall is backfilled, drainage solutions are installed to ensure lasting protection. This includes:
- Perforated drain tiles wrapped in filter fabric to carry water away from the footer.
- Drainage boards or dimple membranes fixed to the wall surface to create a capillary break.
- Gravel backfill layers that reduce hydrostatic pressure.
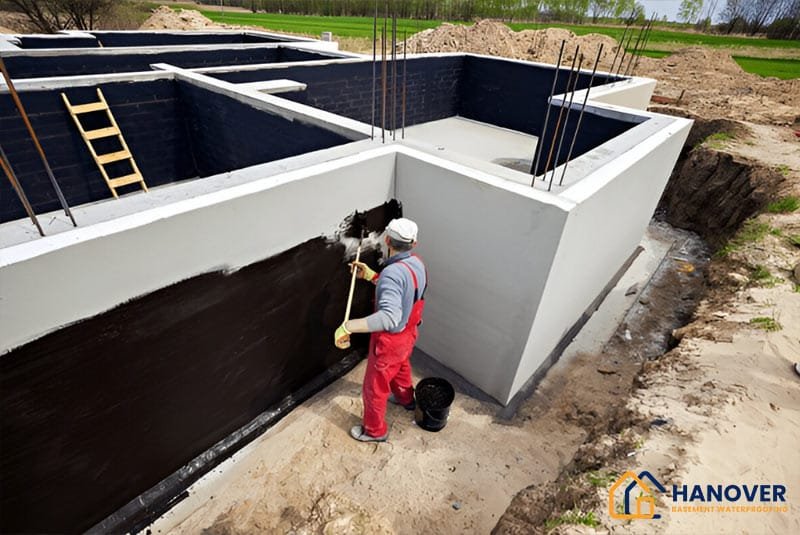
To waterproof the new wall, contractors apply a layer of liquid-applied membrane or self-adhering sheet membrane, ensuring the foundation is protected from groundwater intrusion. Additionally, in colder climates like Hanover, it’s important to insulate the foundation with rigid foam boards to reduce freeze-thaw damage near the footing.
French Drain Installation as a Preventive Measure
A critical part of any foundation wall restoration effort is the implementation of a proper French drain system. This trench-based system diverts groundwater away from the wall base, helping to reduce lateral soil pressure and prevent moisture buildup. The typical installation includes a perforated pipe laid in a gravel-filled trench, covered with landscape fabric to filter sediment.
Positioning the French drain at or below the footer elevation is essential for maximum effectiveness. In Hanover’s freeze-prone environment, installing the pipe below the frost line ensures uninterrupted performance throughout the winter.
Proper discharge is just as important as collection. Drains should empty into either a sump pump basin, storm sewer line, or daylight drainage location where water can flow safely away from the home. Poorly designed French drains that rely solely on gravity without an exit strategy often cause more harm than good.
For technical installation guides, refer to this verified resource: U.S. Department of Energy – Drainage System Guidelines (Building America)
Wall Replacement vs. Structural Repair: Making the Decision
Choosing between wall reinforcement, partial rebuild, and full wall replacement depends on several factors: extent of damage, soil conditions, water management capacity, and budget. In general:
- Use carbon fiber reinforcement for early-stage bowing.
- Use anchor or beam systems for moderate inward deflection.
- Opt for excavation and rebuild when wall integrity is compromised or drainage corrections are impossible without full access.
A structural engineer’s input is critical at this stage. Only licensed professionals can evaluate the wall’s load-bearing status and advise on material specifications that comply with local code. In Pennsylvania, the Uniform Construction Code (UCC) governs these requirements and should be consulted before initiating major work.
If you’re unsure which solution fits your situation, consult professional foundation repair services to assess bowing severity, drainage feasibility, and compliance requirements.
Long-Term Prevention and Maintenance After Repair
Preventive Maintenance for Repaired Foundation Walls
Once a foundation wall has been stabilized or rebuilt, maintaining its integrity over time requires a structured maintenance routine. This includes annual inspections, seasonal adjustments, and prompt action when early signs of deterioration reappear.
At least once per year, especially before the winter season, homeowners should conduct a visual inspection of foundation surfaces, paying close attention to the presence of new cracks, spalling concrete, or efflorescence (white powdery deposits). Check for gaps around downspouts, sinkholes near the wall base, and any bulging in wall profiles, particularly after periods of heavy rainfall or snowmelt.
Vegetation control around the foundation is also essential. Tree roots can penetrate foundation seams or disturb drainage configurations. Always maintain a vegetation-free perimeter of at least 18 to 24 inches around the foundation. Any installed sealants or coatings should be re-evaluated every 5–7 years and reapplied as needed.
For properties with sump pump systems, test the pump regularly and ensure the backup battery is functional. A failed sump system can rapidly flood a basement and reverse thousands of dollars in protective work.
Soil Conditioning and Moisture Regulation
A proactive but often overlooked strategy is soil conditioning, which involves optimizing the soil around the foundation to reduce water retention and pressure. In clay-heavy areas like Hanover, amending soil with coarse sand, organic compost, or gypsum can improve drainage and reduce swelling pressure.
Soil should always be compacted in controlled lifts during landscaping or grading to avoid settlement that could redirect water back toward the structure. If the property has irrigation systems, ensure that they are positioned far from the foundation wall. Overwatering localized areas near the wall line will soften the soil and raise hydrostatic pressure levels.
Where natural drainage is not possible, consider installing controlled subsurface irrigation systems or automatic soil moisture sensors that help regulate water flow and maintain consistent soil density year-round.
Seasonal Foundation Maintenance Checklist
Maintaining a foundation in regions with variable climate conditions requires a seasonal inspection strategy. Below is a guideline:
Spring:
- Inspect walls for cracks or moisture intrusion from snowmelt.
- Test and clear sump pumps and perimeter drains.
- Repair any frost heave-related damage to grading or sidewalks.
Summer:
- Trim vegetation and monitor root systems near walls.
- Apply or reapply exterior sealants and elastomeric coatings.
- Conduct a dry-weather test of drainage systems using hose water.
Fall:
- Clear gutters and downspouts to prevent winter clogging.
- Ensure all drainage systems are pointed away from the home.
- Check for early signs of wall movement post-summer soil contraction.
Winter:
- Keep snow shoveled away from wall edges.
- Inspect basement interior for condensation or frost penetration.
- Minimize indoor humidity to prevent internal moisture pressure.
Consistent application of this checklist ensures that small issues are caught early, minimizing the likelihood of major repairs later.
Cost vs. Benefit Analysis of Foundation Wall Repair
Understanding the financial impact of each repair option allows homeowners to make informed decisions. Below is a simplified comparison for typical costs:
| Repair Method | Average Cost (USD) | Best For |
| Crack Injection | $400–$1,000 | Non-structural cracks and minor seepage |
| Parging and Sealant | $1,000–$2,500 | Surface restoration and waterproofing |
| Carbon Fiber Reinforcement | $3,500–$7,500 | Bowed walls under 2-inch deflection |
| Steel I-Beams | $5,000–$10,000 | Structural support for major bowing |
| Wall Anchors | $7,000–$15,000 | Lateral wall stabilization with soil space |
| Full Excavation & Rebuild | $20,000–$50,000+ | Wall collapse, major structural compromise |
While some preventive solutions may seem expensive upfront, the cost of neglect—such as complete wall failure, flood damage, or structural collapse—can exceed initial investments tenfold.
Final Thoughts on Sustainable Foundation Protection
Protecting your exterior foundation wall isn’t just about fixing visible problems—it’s about engineering a durable, responsive system that actively resists environmental stress. Whether you live in a high-rainfall zone, deal with clay soils, or face harsh freeze-thaw cycles like those common in Hanover, PA, the combination of proper construction methods, proactive drainage control, and routine maintenance ensures the longevity of your structure.
For homes with aging foundations, it’s essential to rethink passive water management and prioritize long-term stability over short-term cosmetic fixes. Seek certified inspection when in doubt, and always favor proven techniques grounded in structural best practices and localized environmental knowledge.
FAQs
1. How do I know if my foundation wall cracks are serious?
Small, hairline cracks are usually cosmetic, but horizontal cracks or stair-step cracks in brick wider than 1/4 inch can indicate serious structural issues. If the crack is growing or allowing water in, it’s time to call a professional.
2. Can I fix foundation cracks myself?
Small vertical or hairline cracks can often be sealed with epoxy or polyurethane. However, if the crack is wide or horizontal or causing leaks, it’s best to get expert help to prevent further damage.
3. What causes foundation wall cracks?
Cracks are usually caused by water pressure, soil movement, freeze-thaw cycles, poor drainage, or tree roots. Over time, these factors stress the foundation, leading to cracks and shifting.
4. How much does it cost to repair a foundation wall?
Costs vary based on the severity of the damage. Small crack repairs can cost $300–$800, while major structural repairs (like underpinning or wall anchors) can range from $3,000 to $15,000 or more.
5. How can I prevent foundation wall damage?
Maintaining gutters, extending downspouts, improving drainage, and sealing small cracks early can keep water away from your foundation. Regular inspections can also catch problems before they become serious.
6. What happens if I ignore foundation cracks?
Ignoring cracks can lead to water leaks, mold growth, bowing walls, and foundation failure. The longer you wait, the more expensive the repair will be.
7. Do foundation cracks mean my house is unsafe?
Not always, but serious cracks can compromise your home’s structural integrity. If you notice large cracks, shifting walls, or uneven floors, get a professional inspection immediately.
8. When should I call a foundation repair specialist?
If you see wide cracks, water leaks, bowing walls, or doors and windows that won’t close properly, don’t wait. Foundation problems worsen over time, and early repairs can save you thousands in the long run.